
AUX-N is the ISOBUS feature that lets you control implements using your tractor's physical buttons — joystick triggers, armrest switches, thumbwheels, and any other button the tractor provides. Instead of tapping a touchscreen or adding aftermarket switches to your cab, you press the buttons already on the armrest.
This covers everything about AUX-N: how it works, how to set it up, and how to get the most out of it. AUX-N is one part of a broader set of ISOBUS terminal solutions — if you're new to how Virtual Terminals and relay control work together, that guide is a good starting point.
What Is AUX-N?
AUX-N stands for Auxiliary Input Type N (where N means "new"). It's the ISOBUS standard for software-based input assignment, defined in ISO 11783-6.
The concept is straightforward:
- An implement connects to ISOBUS and advertises a list of functions it can perform (e.g., "Turn relay 1 on/off")
- The tractor provides a list of physical inputs available for assignment (e.g., "Joystick button 3", "Armrest switch A")
- The operator decides which function goes on which button
- From then on, pressing that button triggers that function
AUX-N creates a software-defined link between physical controls and implement functions. The same joystick button can control a hydraulic valve on one implement and a work light on another — it all depends on how you assign the functions.
AUX-O vs. AUX-N: Old vs. New
Before AUX-N, there was AUX-O (Auxiliary Old). Here's how they differ.
AUX-O (Auxiliary Old)
- Hardware-mapped: Functions were assigned to specific physical inputs at a lower level
- Harder to change: Reassigning a button was more cumbersome
- Simpler protocol: Less overhead, fewer features
- Limited: Supports fewer simultaneous assignments
- No preferred assignments: Every connection required manual setup
AUX-N (Auxiliary New)
- Software-based: Full assignment through VT menus
- Operator-driven: The operator chooses which function goes where
- Persistent: Tractor stores assignments in its own memory
- Preferred assignments: Implements can suggest default button layouts
- Multiple input types: Supports boolean, analog, and bidirectional inputs
- Scalable: Works with any number of functions and inputs
Which Does Your Tractor Support?
| AUX Support | What It Means |
|---|---|
| AUX-N | Software assignment — modern standard |
| AUX-O only | Older assignment system — harder to reassign |
| Both AUX-N and AUX-O | Can use either, AUX-N recommended |
| Neither | No physical button assignment — VT soft keys only |
Most tractors manufactured after 2012-2015 with a full ISOBUS armrest support AUX-N. Check the AEF database at aef-online.org or your tractor's documentation to confirm.
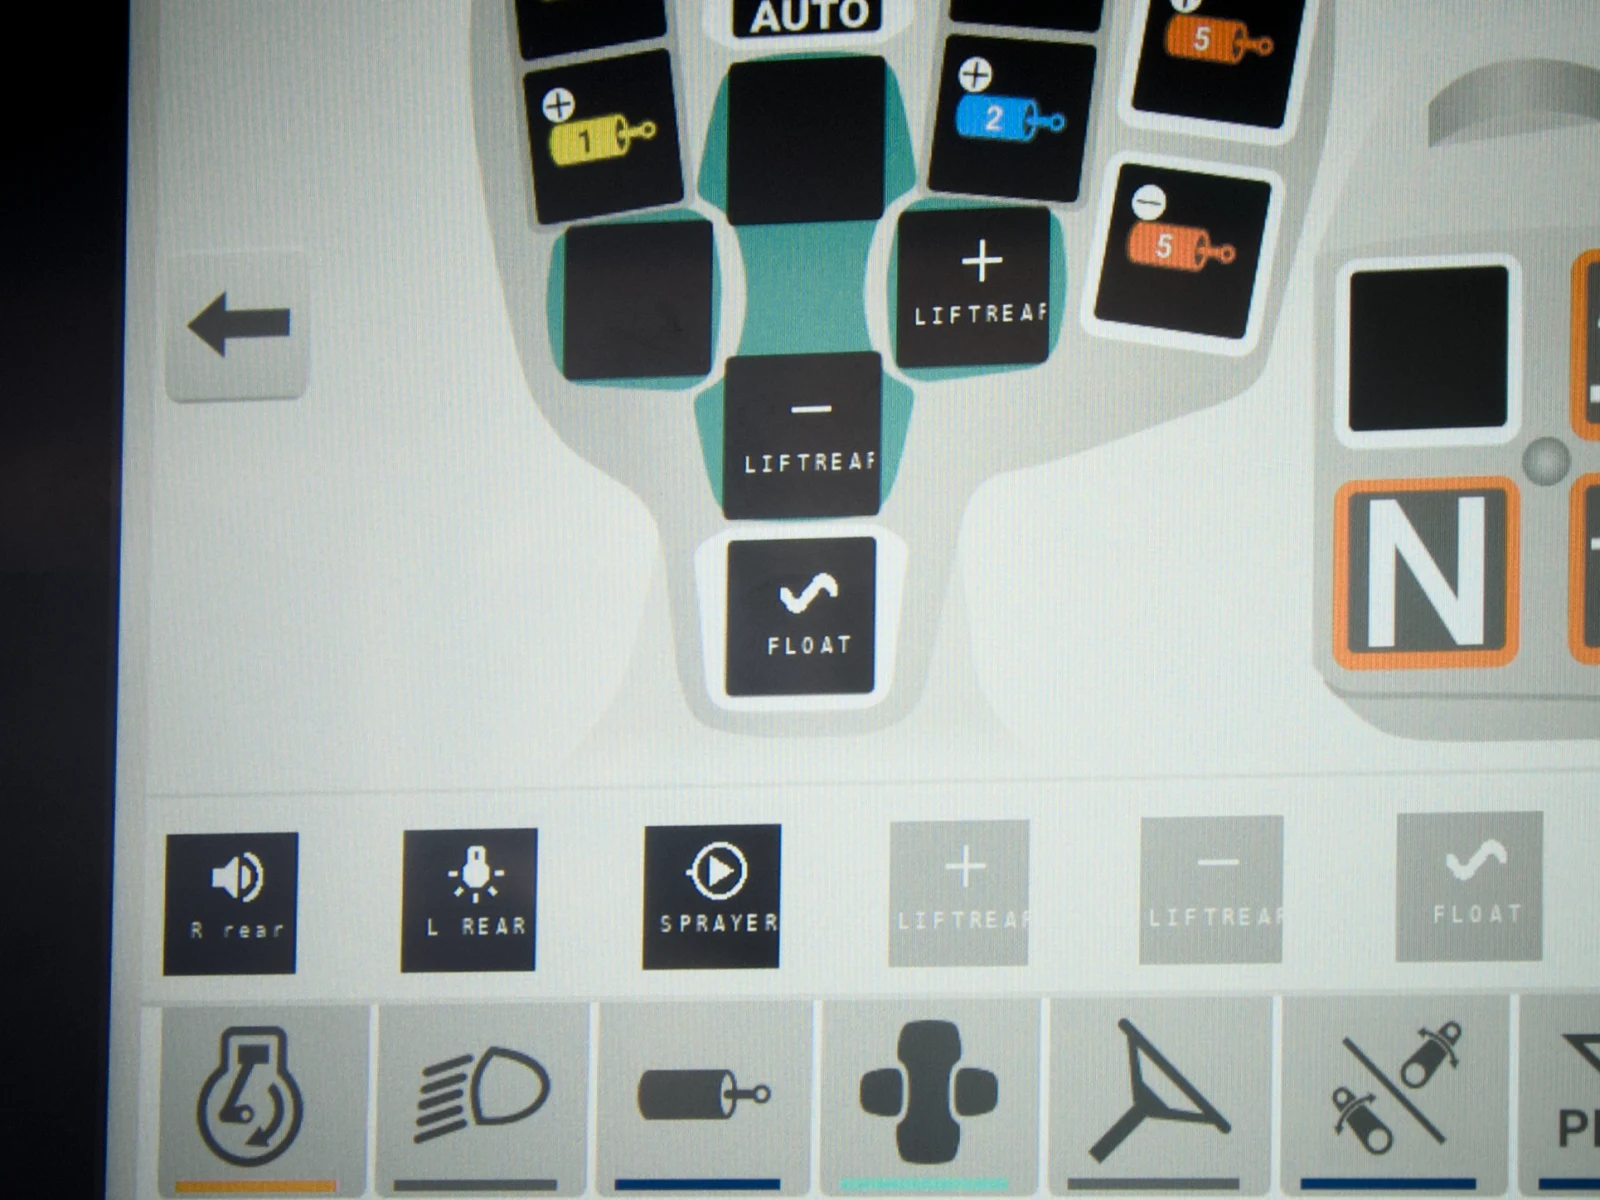
How AUX-N Assignment Works
The AUX-N assignment process involves three parties: the implement (function provider), the tractor (input provider), and the operator (decision maker).
Step 1: Implement Advertises Functions
When an implement connects to ISOBUS and loads its object pool on the Virtual Terminal, it also advertises its available AUX-N functions. Each function has:
- Function name: A descriptive label (e.g., "Relay 1 ON/OFF", "Boom Height Up/Down")
- Function type: Boolean, analog, or bidirectional (more on this below)
- Function icon: A small graphic that appears in the tractor's assignment menu
The implement does not control which button activates a function — it only tells the system what functions are available. The button assignment is entirely on the tractor side.
Step 2: Tractor Presents Available Inputs
The tractor maintains a list of its own physical inputs that support AUX-N:
- Joystick buttons (top, front, side positions)
- Joystick axes (left/right, forward/back)
- Armrest switches and buttons
- Thumbwheels and rotary encoders
- Foot pedals (if available)
- Any other input hardware the tractor manufacturer has made AUX-N capable
Each input has a type (boolean, analog, bidirectional) and a descriptive name or icon.
Step 3: Operator Makes Assignments
Through the tractor's AUX-N assignment menu, the operator matches functions to inputs:
- Open the AUX-N assignment menu on the VT
- See a list of unassigned functions from all connected implements
- Select a function
- Press or move the physical input you want to assign it to
- Confirm the assignment
- Repeat for each function you want to assign
The assignment is now active. Pressing that button will trigger the implement function.
Step 4: Tractor Stores Assignments
The tractor stores AUX-N assignments, not the implement. The assignments are linked to the implement's unique identifier (NAME), so the tractor remembers your configuration even after the implement is disconnected.
Next time you connect the same implement, the tractor automatically reloads your saved assignments. No reconfiguring each time.
If you connect the same implement to a different tractor, you'll need to set up assignments on that tractor — but once done, each tractor remembers its own configuration independently.
Types of AUX-N Inputs
AUX-N supports three categories of input, matching the types of physical controls available:
Boolean Inputs (On/Off)
Boolean inputs have two states: pressed or not pressed.
Physical examples:
- Push buttons on joystick
- Rocker switches on armrest
- Toggle switches
Typical implement functions:
- Relay on/off
- Work light toggle
- Section on/off
- Mode select
Boolean is the most common AUX-N type. Each press either activates the function (momentary) or toggles its state (toggle), depending on how the implement handles the input.
Analog Inputs (Proportional)
Analog inputs provide a continuous range of values — typically 0–100%.
Physical examples:
- Thumbwheels
- Slider controls
- Rotary dials
- Proportional levers
Typical implement functions:
- Flow rate control
- Speed adjustment
- Height control
- Proportional valve position
Analog inputs give you fine-grained control. Moving the thumbwheel adjusts the value proportionally — useful for functions that need more than just on/off.
Bidirectional Inputs (Two-Axis)
Bidirectional inputs report movement in two opposing directions from a center position.
Physical examples:
- Joystick axes (forward/back, left/right)
- Cross-controllers
- Seesaw switches
Typical implement functions:
- Solenoid valve open/close
- Boom raise/lower
- Left/right steering
- Two-directional proportional control
Bidirectional inputs are essential for hydraulic control where you need both extend and retract on one control axis.
Matching Input Types to Functions
The AUX-N system only allows compatible assignments:
| Function Type | Compatible Input Types |
|---|---|
| Boolean function | Boolean input, analog input (used as threshold) |
| Analog function | Analog input, bidirectional input (one direction) |
| Bidirectional function | Bidirectional input |
The tractor's assignment menu will only show compatible inputs for each function type, preventing mismatched assignments.
Preferred Assignments
Preferred assignments let you skip most of the manual setup work when first connecting an implement.
What Are Preferred Assignments?
When an implement uploads its object pool to the VT, it can include a set of preferred assignments — a suggested mapping of its functions to specific types of tractor inputs. Think of it as the implement saying: "If you have a joystick button 3, I'd like my Relay 1 function assigned there."
How They Work
- Implement connects and uploads its pool with preferred assignment data
- The tractor's VT reads the preferred assignments
- If the tractor has matching inputs available (and they're not already assigned), it can automatically apply the preferred assignments
- The operator is shown the proposed assignments and asked to confirm
Benefits
- Saves setup time: Especially for implements with many functions
- Consistent layout: Same implement always suggests the same button layout
- Good defaults: The implement manufacturer recommends ergonomic assignments based on typical tractor layouts
Limitations
- Tractor may ignore them: Not all tractors support preferred assignments, and those that do may handle them differently
- Input availability: If the preferred input is already assigned to another function, the preferred assignment can't be applied automatically
- Operator override: The operator can always change assignments regardless of what the implement prefers
- Tractor-specific inputs: Different tractor brands name and number their inputs differently, so preferred assignments may not map perfectly across all brands
When They're Most Useful
Preferred assignments pay off most when you swap equipment regularly — contractors changing implements throughout the day, for example. The implement's preferred assignments give you a working starting point. Adjust from there if needed.
Practical Setup Guide
Accessing the AUX-N Menu on Common Tractors
| Brand | Navigation to AUX-N Menu |
|---|---|
| John Deere | GreenStar/CommandCenter → Settings → ISOBUS → AUX-N Assignment |
| Fendt | Variotronic → Settings → ISOBUS → AUX-N Configuration |
| Case IH | AFS display → Settings → ISOBUS → Auxiliary Functions |
| New Holland | IntelliView → Settings → ISOBUS → AUX Configuration |
| Massey Ferguson | Datatronic → Setup → ISOBUS → AUX-N Functions |
| Claas | CEBIS → Settings → ISOBUS → AUX-N |
| Valtra | SmartTouch → Settings → ISOBUS → AUX Assignment |
| Deutz-Fahr | iMonitor → System → ISOBUS → Auxiliary |
| Kubota | K-Monitor → Settings → ISOBUS → AUX-N |
Menu names vary by model year and software version. Consult your operator's manual for exact navigation.
Making Your First Assignment
Here's a step-by-step example:
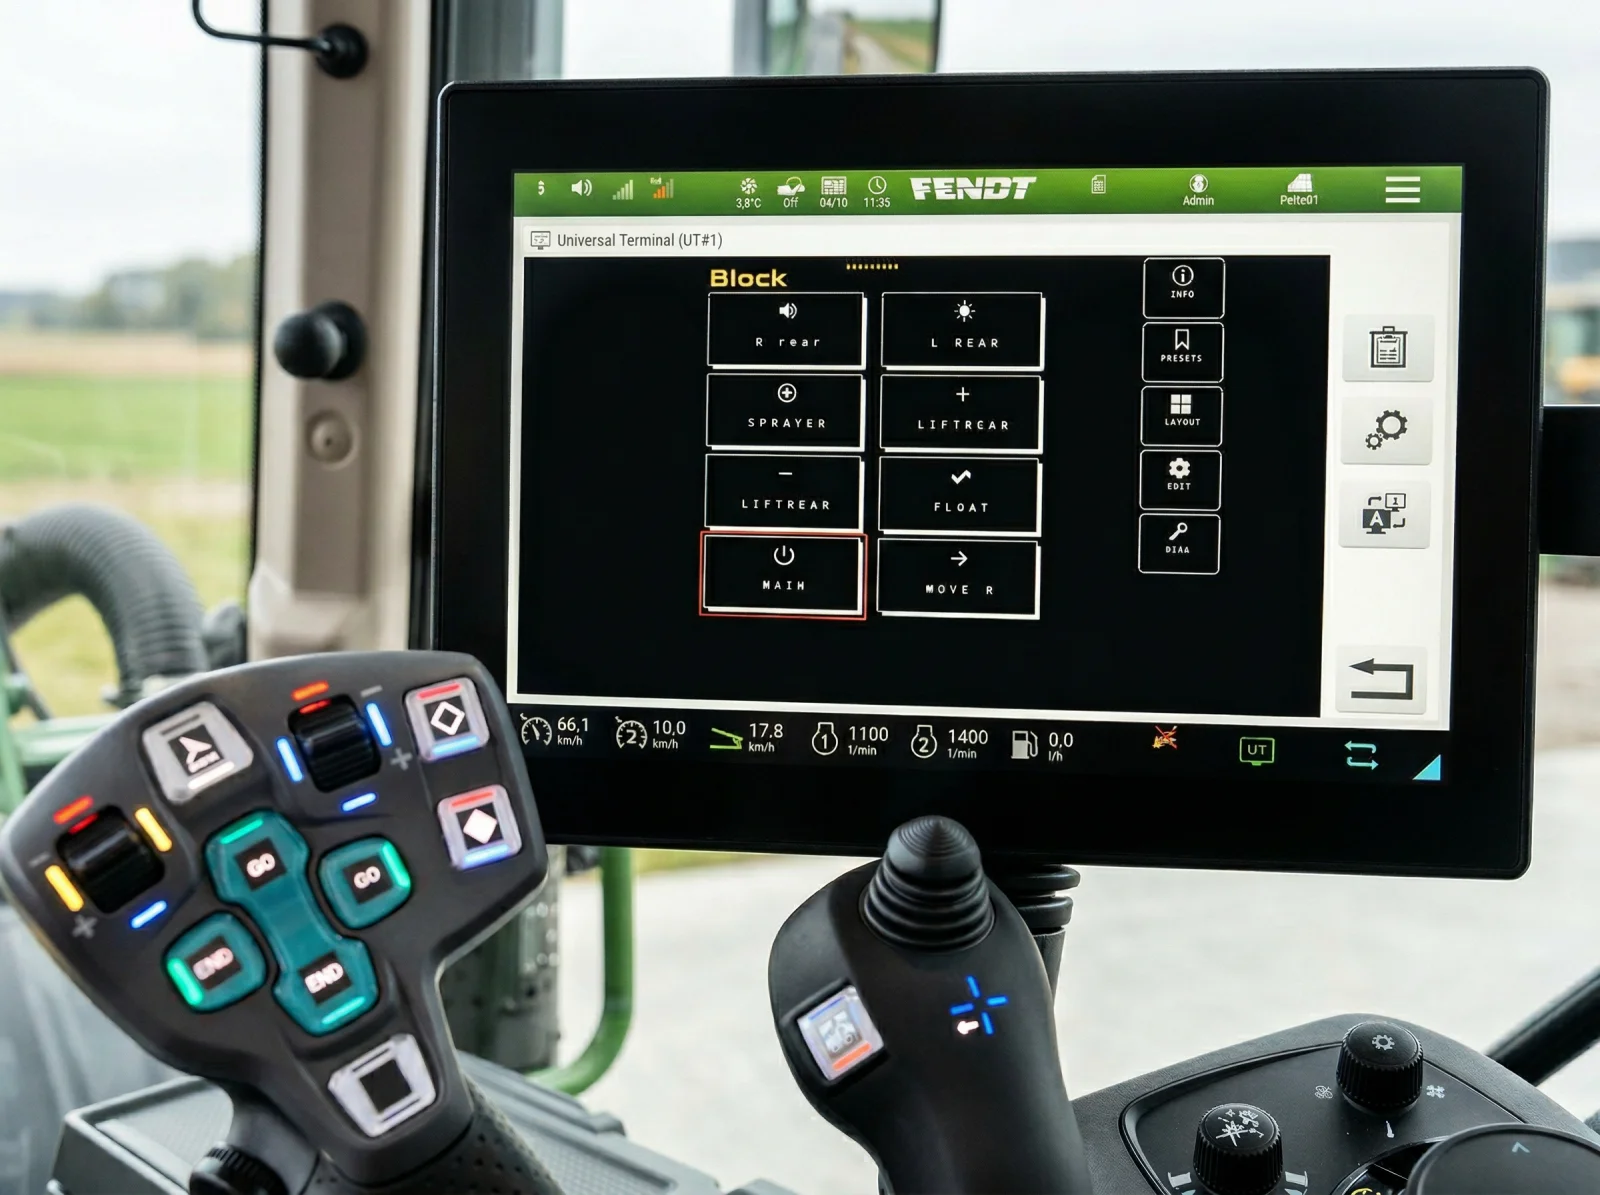
Goal: Assign ISOBUS Block's Relay 1 function to a joystick button.
- Connect ISOBUS Block to the tractor's ISOBUS network
- Wait for the module to appear on the Virtual Terminal (10-30 seconds)
- Open the tractor's AUX-N assignment menu
- Look for "ISOBUS Block" or the module's working set name in the function list
- Select "Input 1" (or "IN1") from the available functions
- The tractor now waits for you to press the desired input
- Press the joystick button you want to use
- The tractor confirms the assignment
- Exit the AUX-N menu
Now pressing that joystick button activates Relay 1 on the ISOBUS Block.
Reassigning Functions
To change an assignment:
- Open the AUX-N menu
- Find the function you want to reassign
- Either delete the current assignment first, or select a new input
- Some tractors allow you to overwrite by simply assigning a new input
- The old assignment is removed and the new one takes effect
Removing Assignments
To unassign a function:
- Open the AUX-N menu
- Select the function
- Choose "Remove" or "Delete" (terminology varies by brand)
- The function is no longer mapped to any physical input
Removing all assignments for a disconnected implement frees up those inputs for other uses.
Troubleshooting AUX-N Issues
Functions Don't Appear in AUX-N Menu
Possible causes:
- The implement hasn't finished loading its object pool on the VT
- Your tractor doesn't support AUX-N (check specifications)
- The implement doesn't provide AUX-N functions
- AUX-N may need to be enabled in tractor settings
Solutions:
- Wait 60 seconds after the implement appears on the VT before checking AUX-N
- Power cycle the entire system (tractor off with main switch, wait 30 seconds, restart)
- Verify AUX-N support in tractor documentation
- Check if AUX-N needs to be activated by dealer settings
Assignment Works but Button Does Nothing
Possible causes:
- The implement's VT working set is not active (some tractors require it)
- The function type doesn't match the input type
- The implement has a configuration issue (e.g., relay channel not configured)
- CAN bus communication problem
Solutions:
- Verify the assignment is correct in the AUX-N menu
- Try the function from the VT soft keys first — if it works there, the AUX-N link is the issue
- Delete the assignment and recreate it
- Check the implement's configuration (in case of ISOBUS Block, verify the input mode and channel assignment on the VT)
Assignments Don't Persist After Restart
Possible causes:
- The tractor's memory is full (too many stored assignments)
- The implement's NAME (unique identifier) changed (e.g., after firmware update)
- Tractor firmware bug
Solutions:
- Clear old assignments for implements you no longer use
- If the implement was recently updated, you may need to redo assignments
- Check for tractor firmware updates from your dealer
AUX-N Button Has Delay
Possible causes:
- CAN bus load is high (many implements sending data simultaneously)
- The implement has processing overhead before activating the function
- VT is busy (uploading another implement's pool)
Solutions:
- AUX-N response time should be under 200ms in most cases
- Disconnect unused ISOBUS implements to reduce bus load
- If the delay is consistent, it may be normal for that implement's processing
Multiple Implements Competing for Same Button
Possible causes:
- Two implements both want the same physical input for different functions
- Previous assignments from a disconnected implement are still stored
Solutions:
- Only one function can be assigned to each physical input
- Clear assignments for disconnected implements to free up inputs
- Reassign functions to different inputs to accommodate all implements
AUX-N Best Practices
Ergonomic Assignment
Think about your workflow when assigning buttons:
- Most-used functions should go on the most accessible buttons (joystick top buttons, primary armrest switches)
- Safety-critical functions should be on buttons that are hard to press accidentally
- Related functions should be on adjacent buttons (e.g., extend/retract on opposite sides of a rocker)
- Rarely-used functions can go on less accessible buttons or use VT soft keys instead
Document Your Assignments
Keep a note of which functions are assigned to which buttons, especially when running multiple implements. Most operators develop muscle memory quickly, but a record helps when:
- A different operator uses the machine
- You swap implements after a long period
- You're setting up a new tractor and want to replicate your layout
Use Toggle vs. Momentary Intentionally
For ISOBUS Block and similar devices, consider which mode makes sense for each function:
- Momentary (active only while pressed): Best for hydraulic valves, temporary actions
- Toggle (press once on, press again off): Best for work lights, continuous operations
Configure the mode on the implement side to match how you'll use each function with AUX-N buttons.
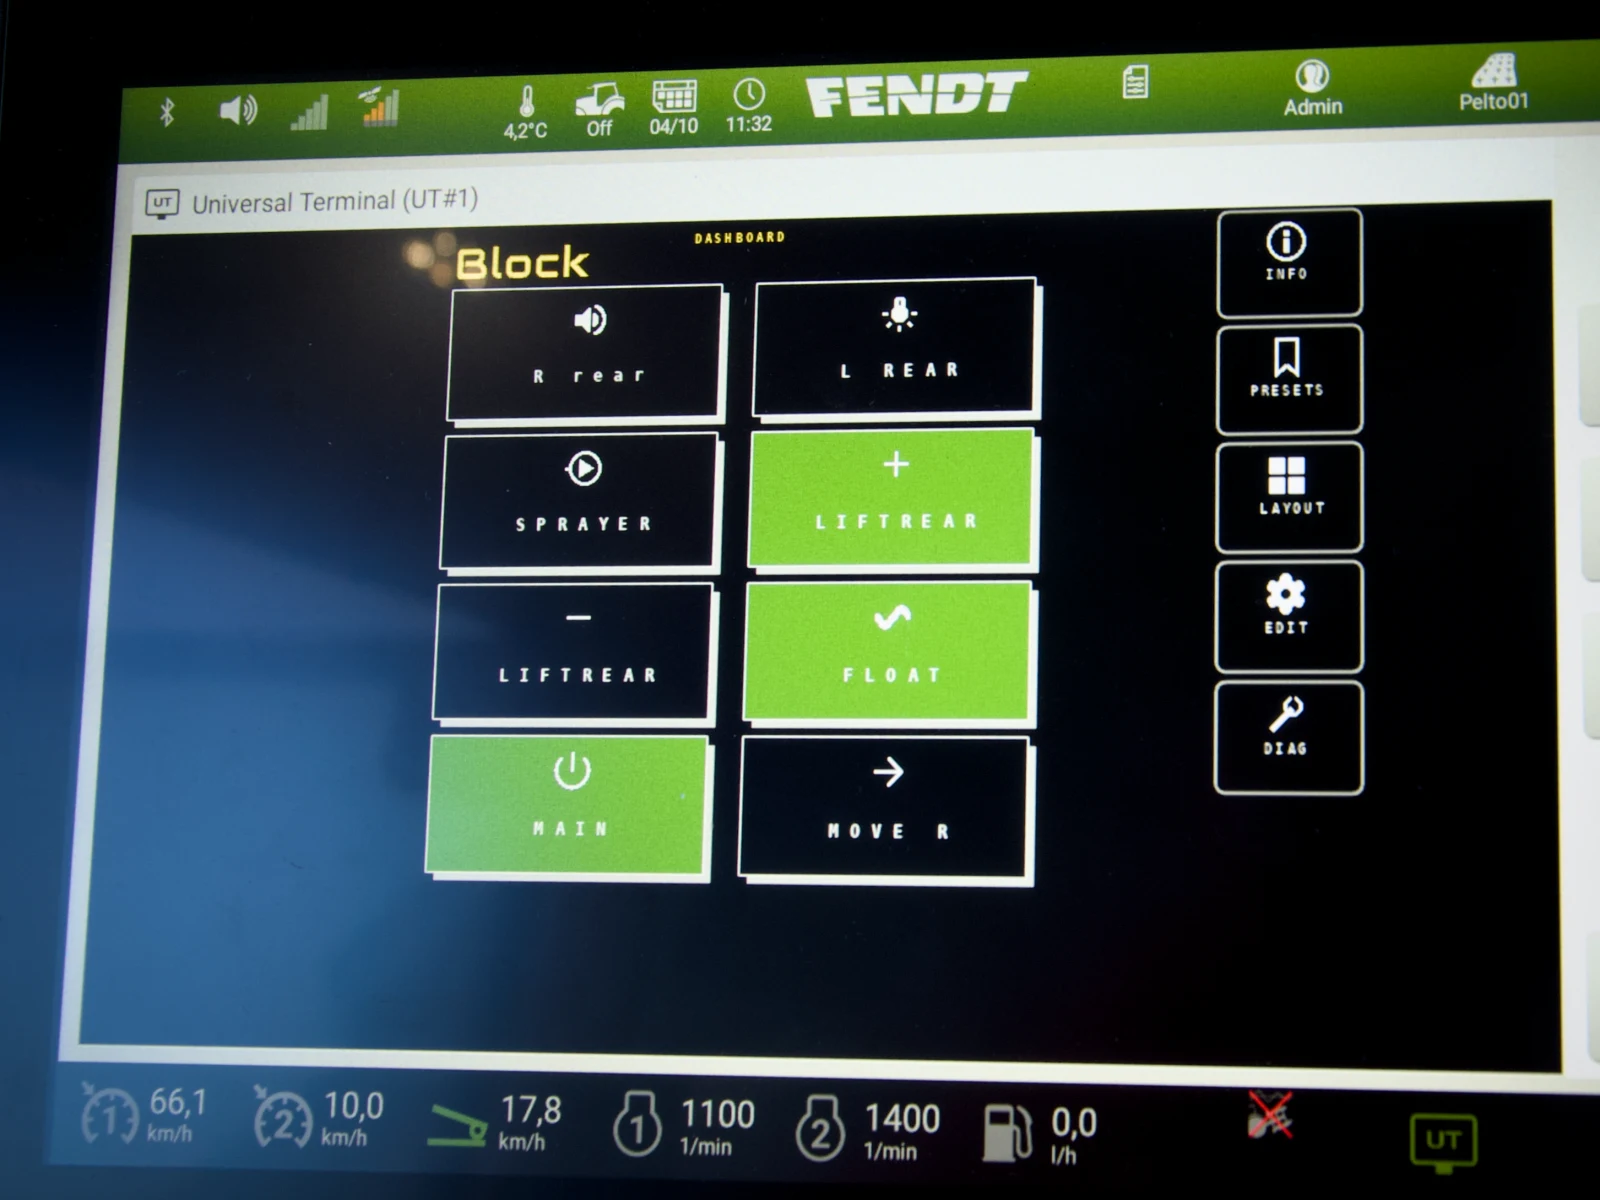
Relay Control via AUX-N: ISOBUS Block
AUX-N is what makes a relay module work from the armrest instead of a separate switchbox. ISOBUS Block provides 8 boolean AUX-N functions — one per relay channel, CH1–CH8 — that you assign to whatever joystick button or armrest switch you prefer. Wire a solenoid or work light to a relay, assign the channel to a button, done.
ISOBUS Block provides 8 AUX-N functions, one for each relay channel:
| Function | AUX-N Name | Type | Description |
|---|---|---|---|
| IN1 | Input 1 | Boolean | Controls relay channel 1 |
| IN2 | Input 2 | Boolean | Controls relay channel 2 |
| IN3 | Input 3 | Boolean | Controls relay channel 3 |
| IN4 | Input 4 | Boolean | Controls relay channel 4 |
| IN5 | Input 5 | Boolean | Controls relay channel 5 |
| IN6 | Input 6 | Boolean | Controls relay channel 6 |
| IN7 | Input 7 | Boolean | Controls relay channel 7 |
| IN8 | Input 8 | Boolean | Controls relay channel 8 |
All functions are boolean (on/off), making them compatible with any push button, rocker switch, or toggle switch on your tractor's armrest or joystick.
Each input can be set up independently on the Virtual Terminal as momentary or toggle mode. The AUX-N assignment determines which button activates the input; the VT settings determine how the input behaves (momentary vs. toggle) and which relay channels it controls (single or grouped).
Choose your button, set the behavior, select which relays activate. No rewiring needed.
Frequently Asked Questions
What is AUX-N on ISOBUS?
AUX-N (Auxiliary Input Type N) is the ISOBUS standard for software-based assignment of implement functions to tractor controls. It lets you map functions like "Relay 1 On/Off" to physical buttons on your joystick, armrest, or other tractor inputs. The "N" stands for "new," distinguishing it from the older AUX-O system.
How do I assign ISOBUS functions to my joystick?
Open your tractor's AUX-N assignment menu (found in ISOBUS settings), select the implement function you want to assign, then press the joystick button you want to use. The tractor stores this assignment and activates the function whenever you press that button.
What is the difference between AUX-O and AUX-N?
AUX-O (old) uses hardware-level mapping — reassigning a button is cumbersome. AUX-N (new) is software-based: the operator assigns any implement function to any compatible tractor input through the VT menu. AUX-N assignments persist in the tractor's memory and support preferred assignments suggested by implements.
Do all ISOBUS tractors support AUX-N?
No. AUX-N support depends on the tractor model and year. Most modern tractors with full ISOBUS armrests support AUX-N, but some older or entry-level models may only support AUX-O or have no auxiliary input support. Check your tractor's specifications or the AEF database at aef-online.org.
What are preferred assignments in AUX-N?
Preferred assignments are default button mappings suggested by the implement. When you first connect, the tractor may offer to apply these defaults automatically. They cut setup time but the operator can override them. Not all tractors support preferred assignments.
Can I use AUX-N without a Virtual Terminal display?
No. AUX-N is part of the ISOBUS VT system. The implement must first load its object pool on the VT before AUX-N functions become available. However, once assigned, AUX-N buttons work regardless of which implement's interface is currently displayed on the VT screen.
Why doesn't my AUX-N assignment work?
Common causes include: the implement hasn't finished loading on the VT (wait 60 seconds), function and input types don't match (boolean function needs boolean input), or a CAN bus communication issue. Try the function from the VT soft keys first — if it works there, the AUX-N link needs to be reassigned.
Are AUX-N assignments stored in the tractor or the implement?
In the tractor. This means your button layout persists even when the implement is disconnected. Each tractor stores its own assignments independently, so you'll need to configure each tractor you use separately.
Can two implements share the same button?
No. Each physical input can only be assigned to one function at a time. If you have two implements that both need a joystick button, you'll need to assign them to different buttons. Alternatively, you can reassign on-the-fly through the AUX-N menu when switching between implements.
Related Resources
- ISOBUS Compatibility Guide — Check if your tractor supports AUX-N
- ISOBUS Virtual Terminal Explained — How VT and AUX-N work together
- How to Install Work Lights Using ISOBUS and AUX-N — Practical AUX-N example with work lights
- How to Control Any Device from Your ISOBUS Terminal — Complete setup guide for relay control
Ready to control relays from your tractor's joystick? ISOBUS Block provides 8 AUX-N functions, each assignable to any button on your armrest or joystick. Quick questions on AUX-N assignment, button modes, and tractor compatibility are covered on the FAQ page. Learn more or contact us.