
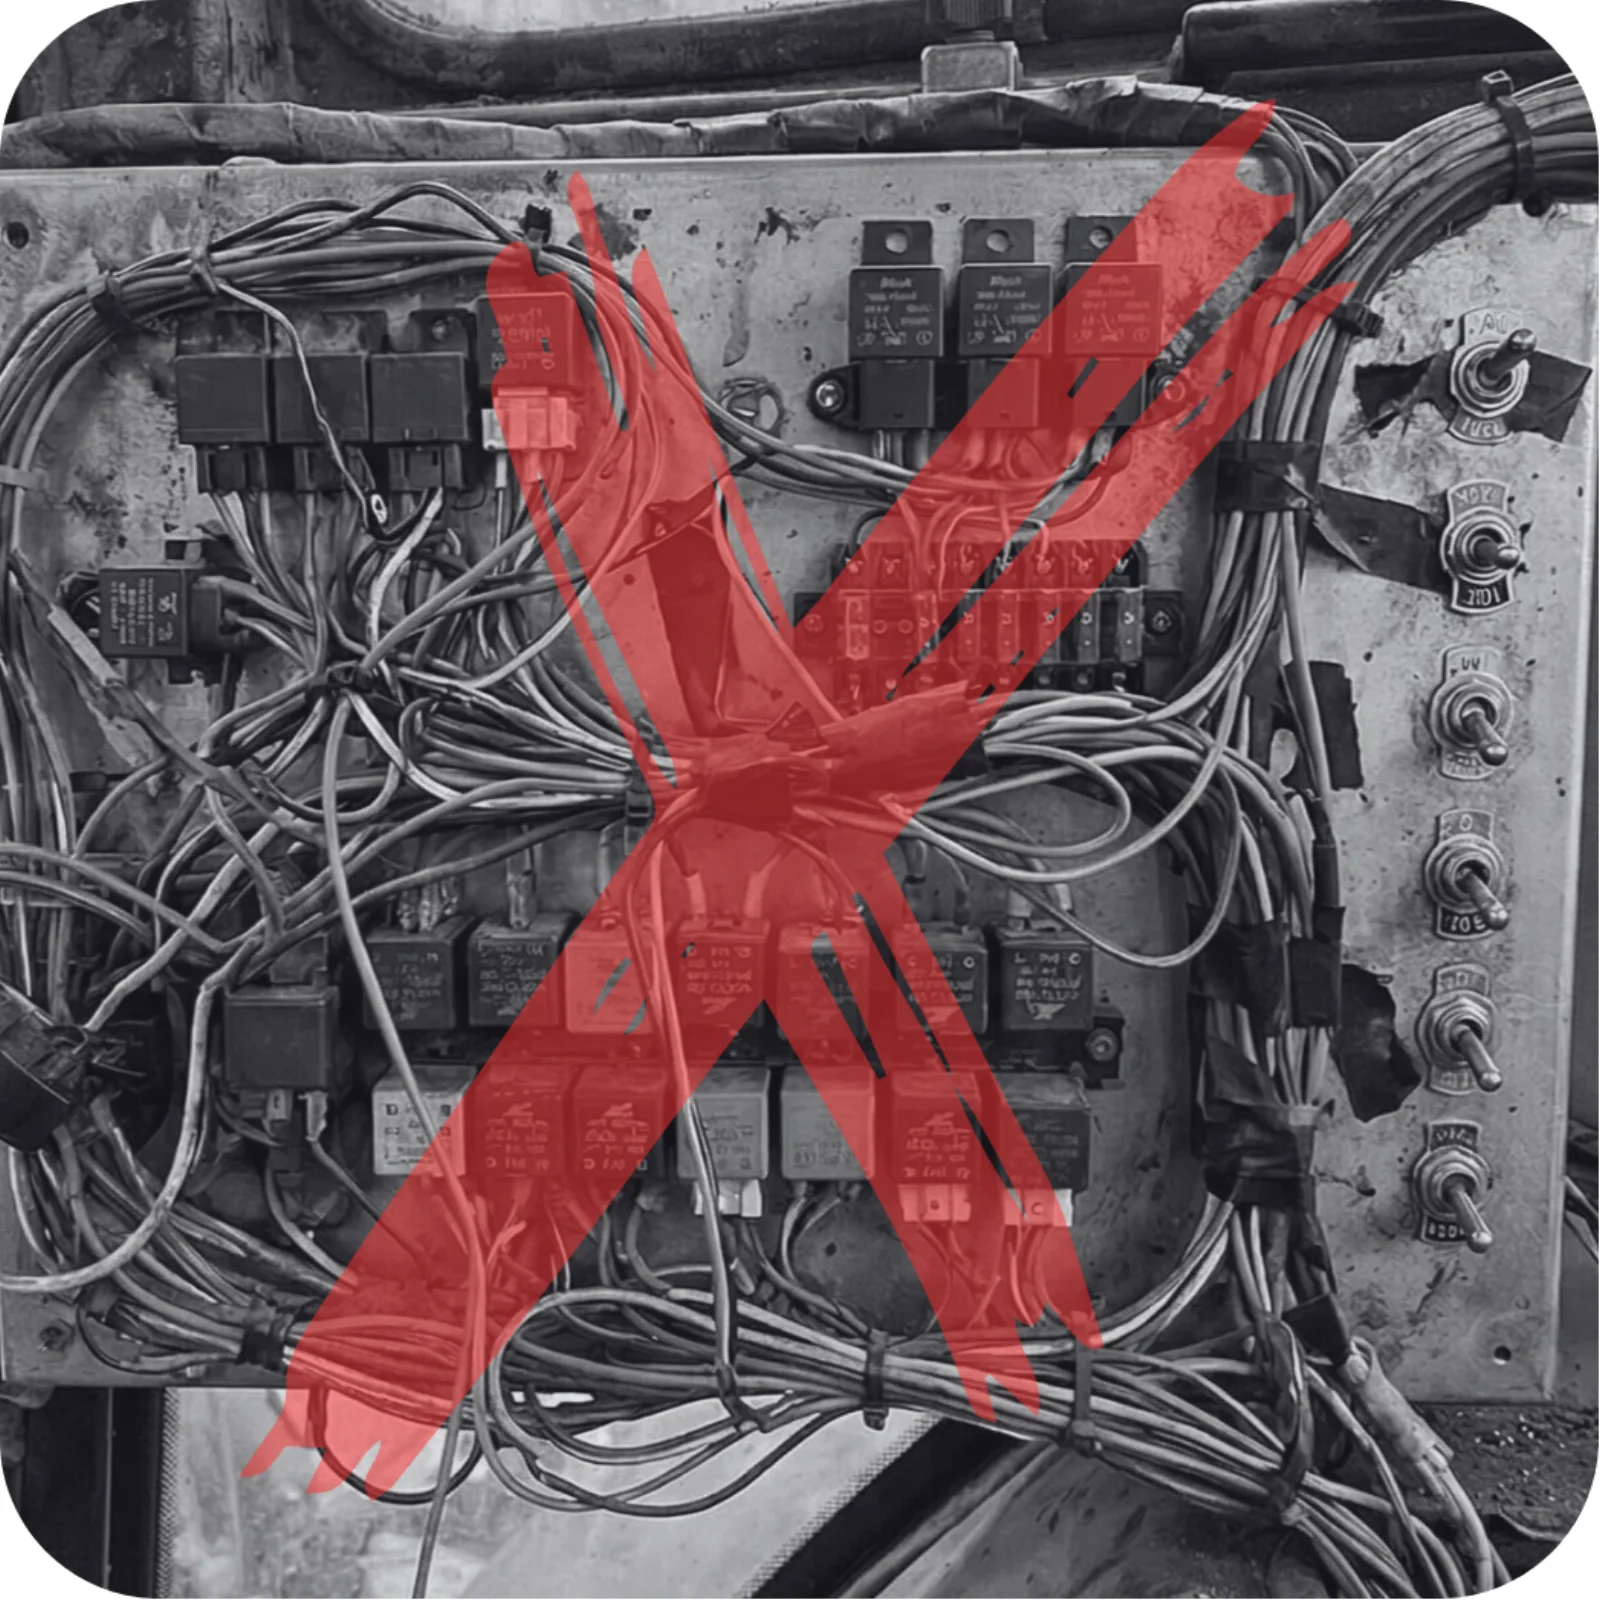
You have a modern tractor with ISOBUS and an armrest full of buttons. You also have an implement or accessory that needs switching—work lights, solenoid valves, a beacon, or some hydraulic function. The traditional approach means drilling holes in your cab, mounting toggle switches, and running wires everywhere.
You don't have to do that.
Quick Summary
The idea: Use an ISOBUS relay module to control any 12V/24V device from your tractor's existing joystick and armrest buttons.
How it works:
- Relay module connects to ISOBUS and appears on your Virtual Terminal
- Assign relay channels to your tractor's buttons via AUX-N
- Press button → relay activates → device turns on
What you can control: Work lights, solenoid valves, beacons, diverter valves, electric motors—anything that needs switching.
Key benefits:
- No drilling holes or adding switches to the cab
- Set everything up from the tractor screen
- Tractor remembers your button assignments
- Works with any ISOBUS tractor
Skip to wiring example → | Skip to FAQ →
The Problem with Traditional Relay Installations
Adding electrical control to agricultural equipment usually means:
- Toggle switches drilled into the cab dashboard or console
- Relay boxes hidden behind panels or under seats
- Custom wiring routed through the cab to power sources
- Fuses spliced into the electrical system
- Different setups in every tractor you use
The result works, but every tractor ends up with a collection of mismatched switches, each wired separately, none of them talking to the tractor.
And when you move the implement to a different tractor? Start the wiring process all over again.
The ISOBUS Approach: Use What You Already Have
Modern tractors with ISOBUS already have everything you need:
- A Virtual Terminal display for controlling implements
- Joystick buttons and armrest switches you can assign to functions
- AUX-N capability that lets implements use those buttons
- A standardized connector that provides power and communication
Instead of adding switches to the cab, you add a relay module to the implement side. The module connects to ISOBUS and appears on your tractor's display. Your existing buttons control the relays. For a broader look at what ISOBUS terminal solutions can control — from hydraulic valves to work lights — that guide covers the full picture. For the technical detail on how the Virtual Terminal renders implement interfaces and manages object pools, see ISOBUS Virtual Terminal Explained.
No cab modifications. No drilling. No aftermarket switch panel.
What Can You Control?
If it runs on 12V or 24V electricity and needs switching on or off, you can control it from your ISOBUS terminal. Common applications include:
Solenoid Valves
- Diverter valves for hydraulic multiplexing
- Section control valves on sprayers and planters
- Hydraulic lock valves
- Solenoid valves (e.g. diverter valves, lock valves)
Lighting
- Work lights (front, rear, side)
- Beacon lights and strobes
- Warning lights
- Implement-mounted lighting
Accessories
- Electric motors (fans, pumps)
- Horns and alarms
- Heating elements
- Any switched electrical load up to 10A
Hydraulic Functions
- Third function for front loaders (via diverter valve)
- Fourth and fifth functions
- Implement auxiliary hydraulics
You're not controlling the device directly from the tractor. You're controlling a relay that switches power to the device. This keeps high currents outside the ISOBUS network and lets you switch any 12V or 24V electrical load.
How It Works: The Basic Setup
The concept is simple:
- ISOBUS Block connects to your tractor's ISOBUS network
- It appears on the Virtual Terminal as a controllable device
- You assign relay outputs to your tractor's joystick or armrest buttons via AUX-N
- When you press a button, the corresponding relay closes
- The relay switches power to your device (light, solenoid, motor, etc.)
For a layer-by-layer breakdown of how VT, AUX-N, and the relay module fit together, see the ISOBUS Implement Control Guide.
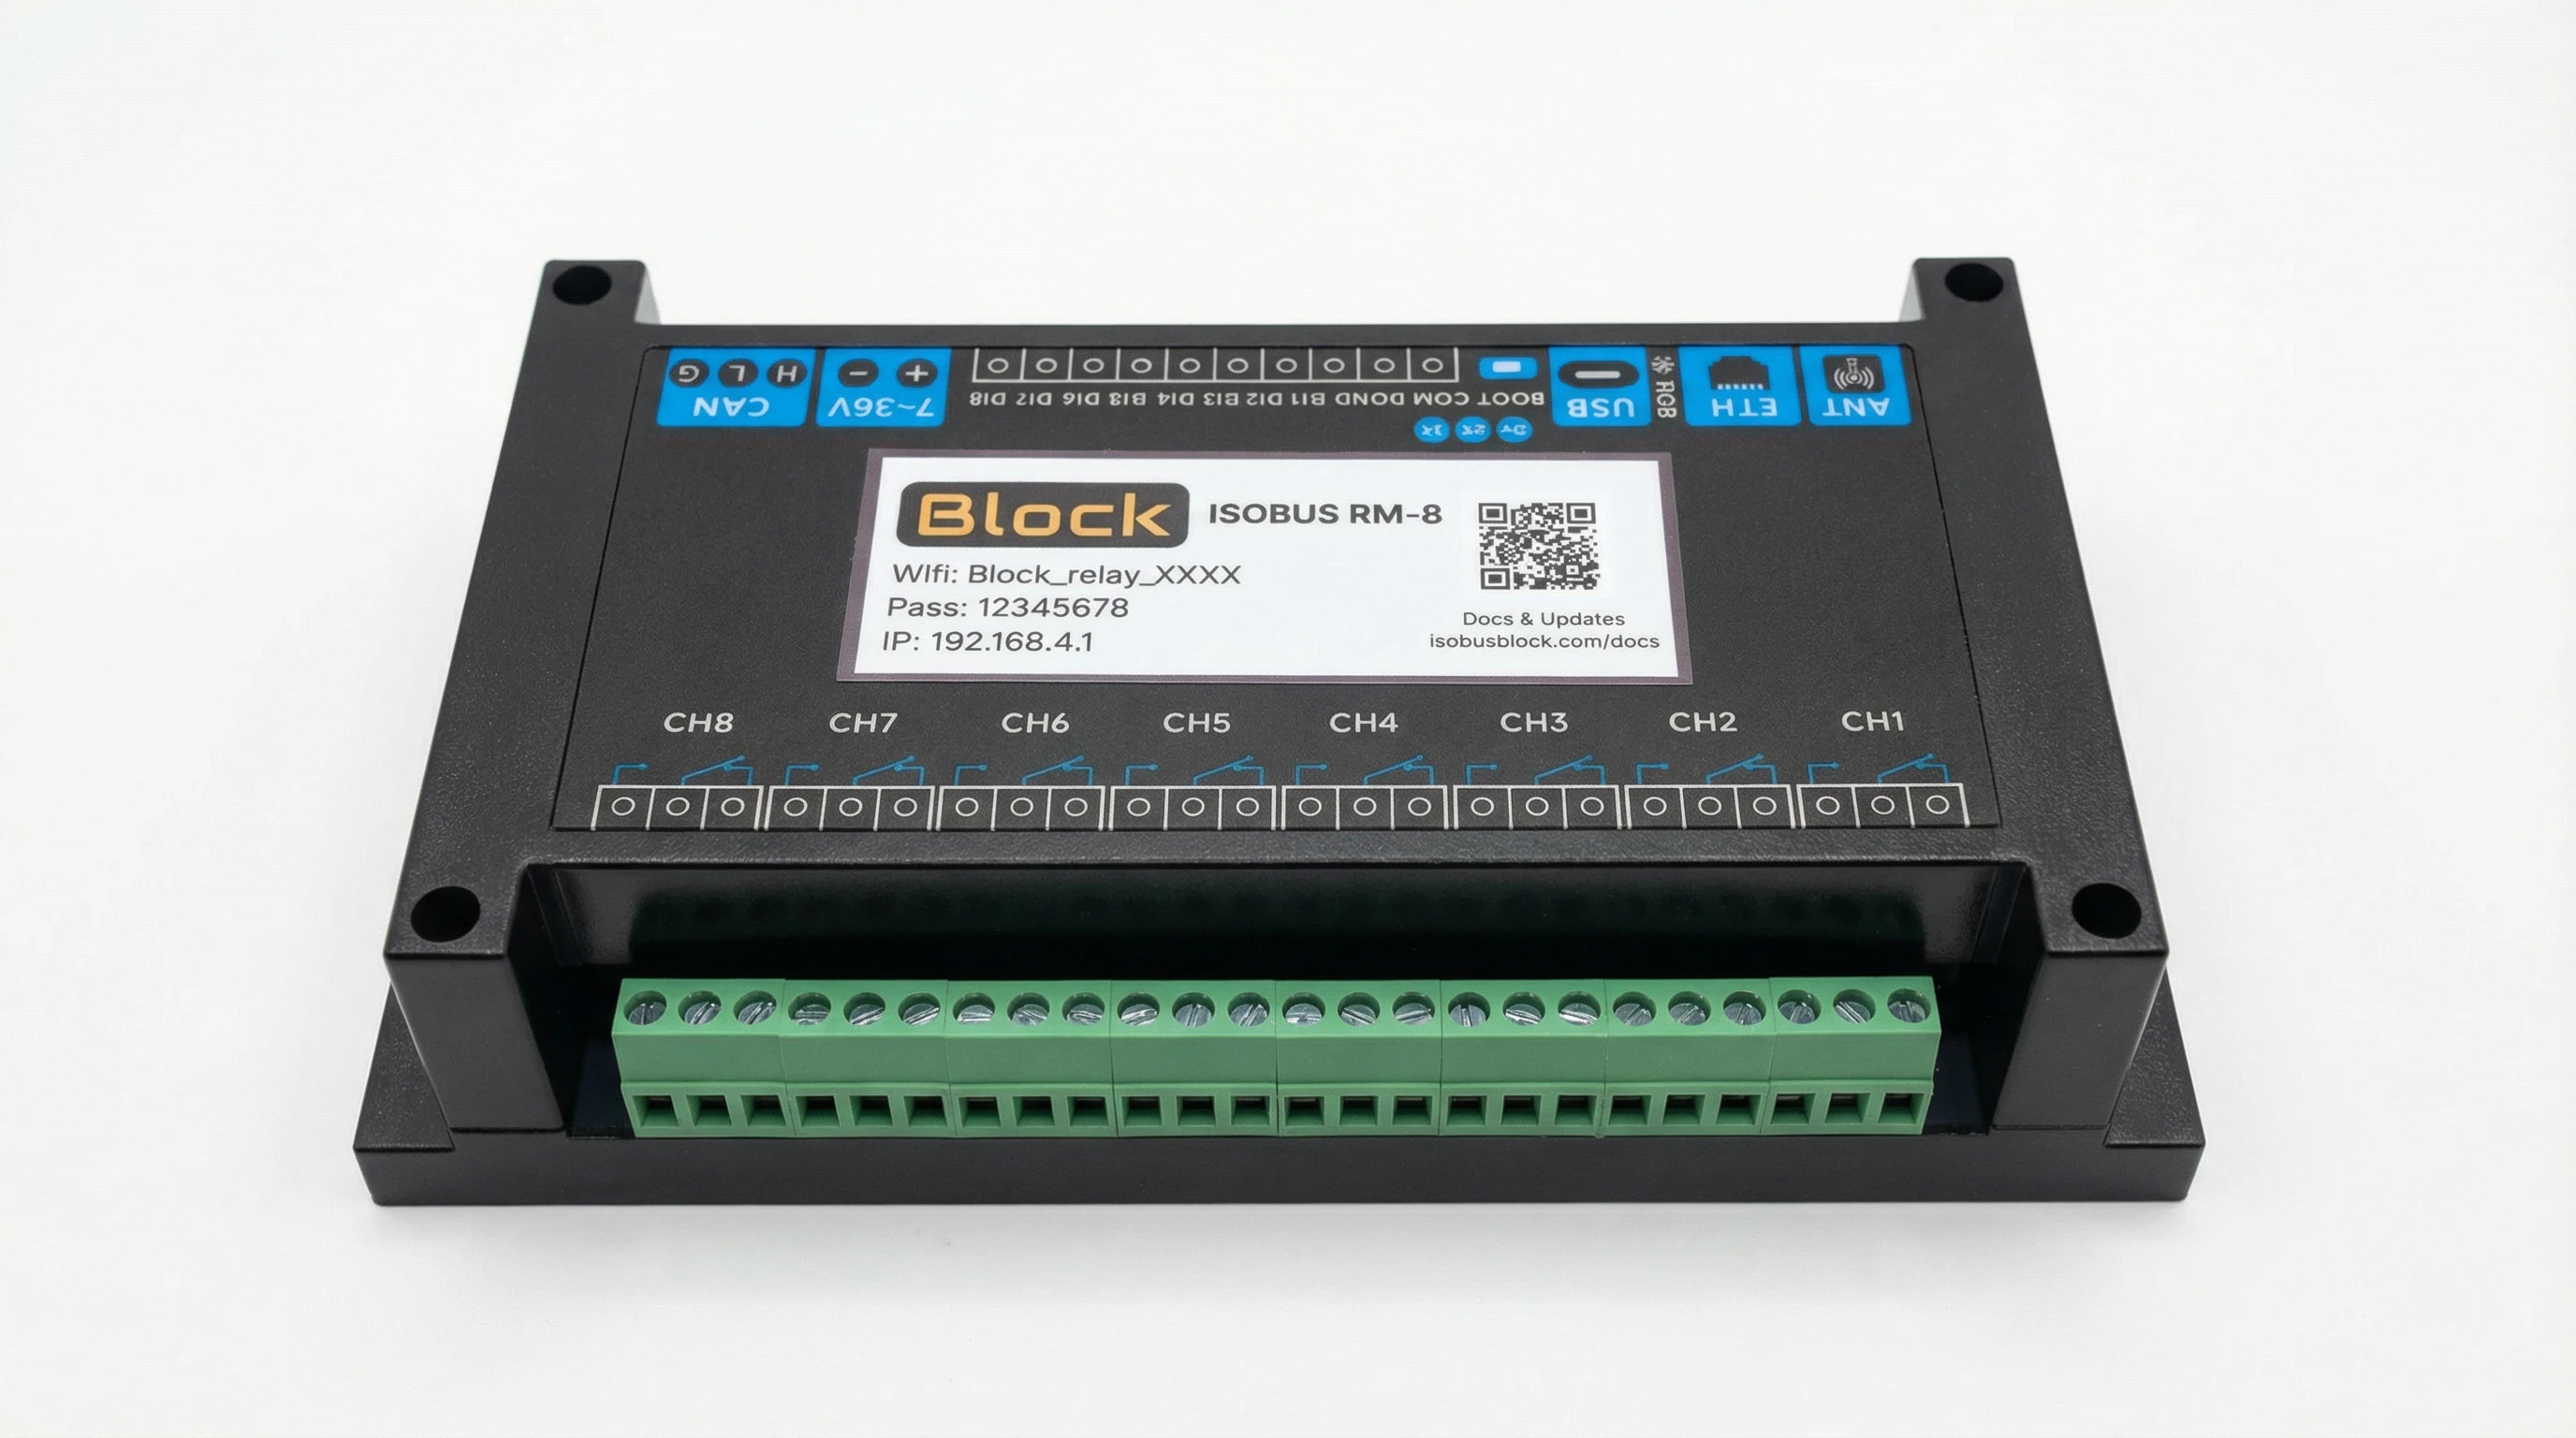
The Wiring
Each relay channel has three terminals:
| Terminal | Function |
|---|---|
| COM | Common - connect to power source |
| NO | Normally Open - closed when relay is ON |
| NC | Normally Closed - open when relay is ON |
For most applications, you wire like this:
Power (+12V/24V) → COM terminal
NO terminal → Device positive
Device negative → Ground
When the relay activates, it connects COM to NO, completing the circuit to your device.
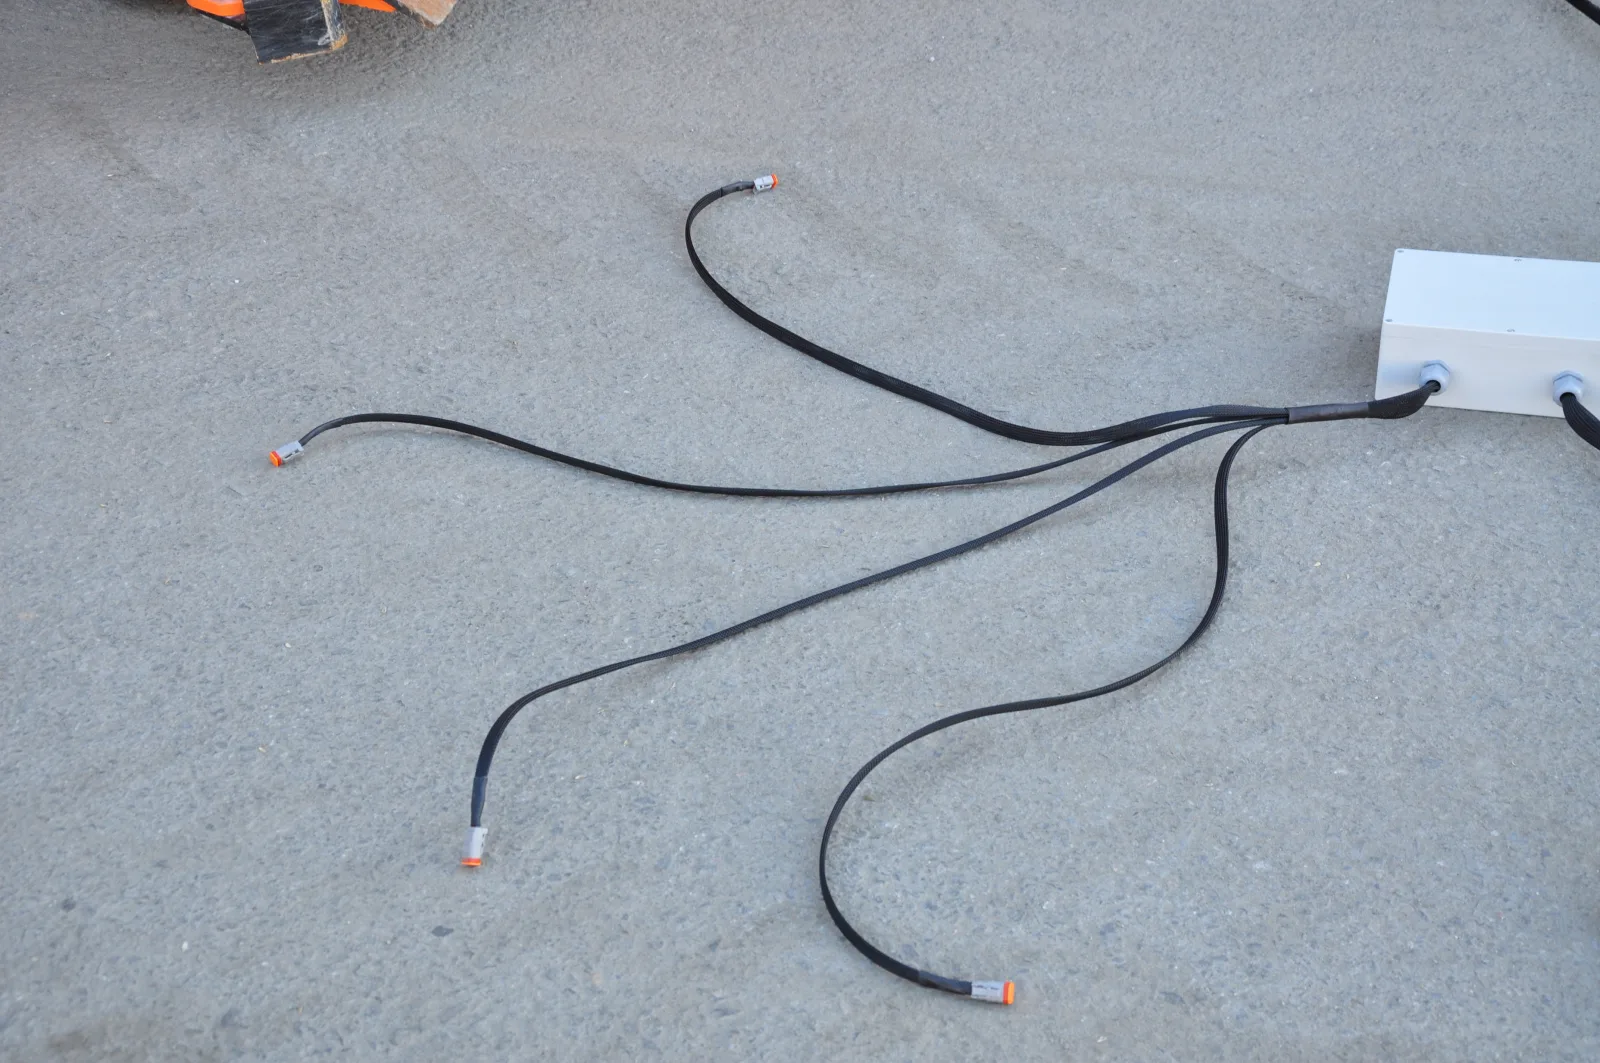
The ISOBUS Connection
The module needs:
- CAN_H and CAN_L connections to the ISOBUS network
- Power (7–36V DC) — delivered through the ISOBUS connection itself
Most tractors have a rear external ISOBUS connector and an in-cab ISOBUS connector. You can use either — both carry CAN and power.
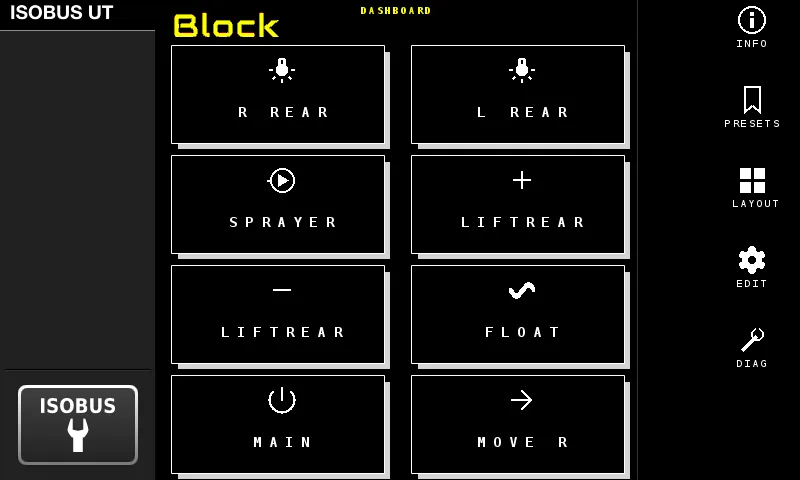
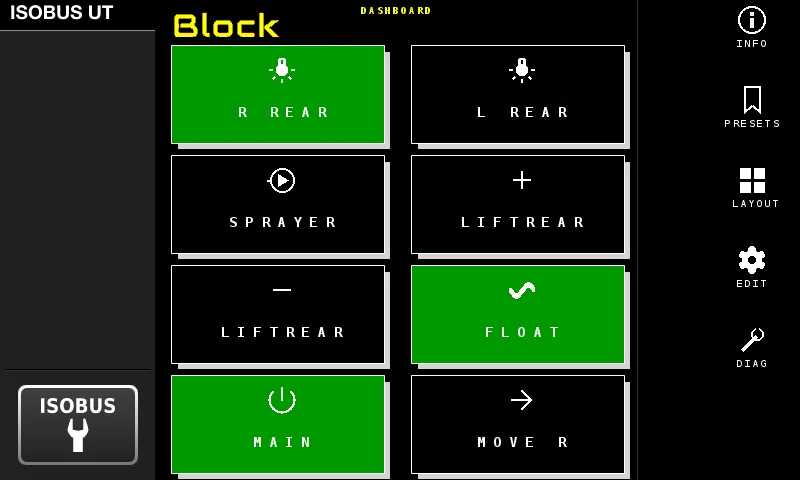
Configuration: Assign Buttons to Relays
Once connected, the module appears on your Virtual Terminal. Configuration happens right there on the tractor's screen—no laptop or phone app required.
Step 1: Access AUX-N Menu
Your tractor has an AUX-N assignment menu somewhere in the settings. The exact location varies by brand:
| Brand | Where to Find AUX-N Settings |
|---|---|
| John Deere | GreenStar display → Settings → ISOBUS → AUX-N |
| Fendt | Variotronic → Settings → ISOBUS → AUX-N Configuration |
| Case IH / New Holland | AFS display → Settings → ISOBUS → Auxiliary |
| Massey Ferguson | Datatronic → Setup → ISOBUS → AUX Functions |
| Claas | CEBIS → Settings → ISOBUS → AUX-N |
| Valtra | SmartTouch → Settings → ISOBUS → AUX |
Step 2: Assign Functions to Buttons
The ISOBUS Block provides 8 functions (one per relay channel). In your tractor's AUX-N menu:
- Find "ISOBUS Block" or "Relay Module" in the implement list
- Select a function (Input 1-8)
- Press the armrest button or joystick button you want to use
- Confirm the assignment
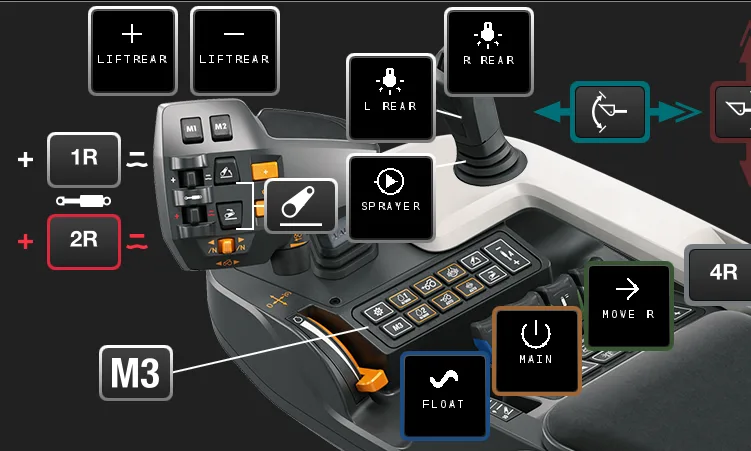
Repeat for each function you want to control.
Step 3: Choose Momentary or Toggle Mode
Each channel can operate in two modes:
Momentary: Output is ON only while you hold the button
- Best for: hydraulic valves, horns, anything that should activate only while pressed
Toggle: Each press switches the output ON or OFF
- Best for: work lights, beacons, anything that should stay on until you turn it off
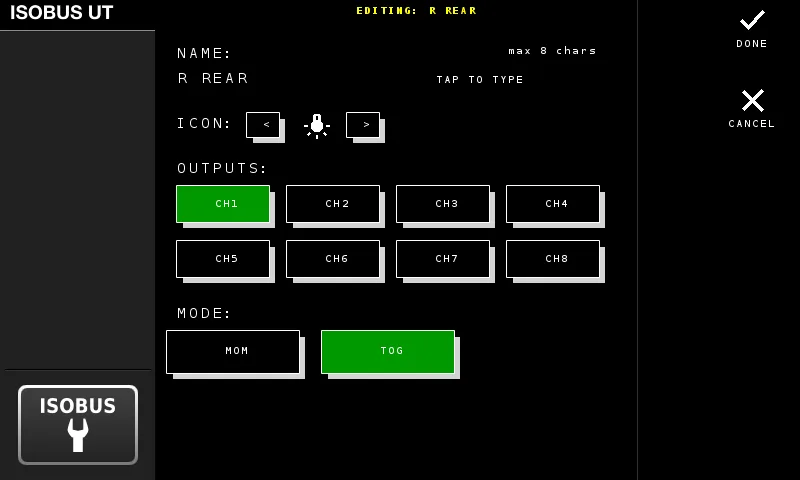
Set this on the Virtual Terminal display by tapping the input button and selecting the mode.
Advanced: Grouped Outputs
Here's where it gets powerful. You can configure one button to activate multiple relays simultaneously.
Example use case: Front loader with third-function hydraulics and work light
You want one button press to:
- Activate the diverter valve solenoid (switch to third function)
- Turn on the work light that illuminates the attachment
Configure Input 1 to control both Channel 1 (diverter) and Channel 2 (work light):
Now one button does both jobs. Press again, both turn off.
One button, two outputs, switched in sync. One line in the VT does what used to take a second relay and a diode.
Real-World Example: Adding Work Lights
Let's walk through a complete example.
Goal: Control implement-mounted LED work lights from the tractor armrest.
What you need:
- ISOBUS Block module
- LED work lights (combined draw under 10A)
- Wire to connect lights to relay terminals
Wiring:
Power supply (+12V):
  +12V → Channel 1 COM terminal
  Channel 1 NO terminal → Work light positive
  Work light negative → Ground

ISOBUS connection:
  One 9-pin ISOBUS cable from the tractor's in-cab or rear external
  ISOBUS connector into the module. CAN and power ride the same cable.
Configuration:
- Power on tractor and wait for Virtual Terminal to boot
- Module appears on VT display
- Go to tractor's AUX-N menu
- Assign "Input 1" to your preferred armrest button
- On VT display, tap Input 1 and set to Toggle mode
- Tap Channel 1 to ensure it's selected (green)
- Press BACK to save
Result: Press the armrest button, lights turn on. Press again, lights turn off. The tractor remembers this assignment even after power cycling.
Why This Matters for Daily Operations
Clean Cab
No toggle switches, no relay boxes visible, no custom wiring through the cab. The module lives on the implement side.
Same Buttons You Already Use
You assign relay channels to the joystick triggers and armrest switches you already use for hydraulics. No new muscle memory to build.
Persistent Settings
Your AUX-N button assignments are stored in the tractor. Disconnect the implement, reconnect it later—your button layout is exactly where you left it.
Works Across Equipment
The same module works with any ISOBUS tractor. Move it to a different machine, reassign the buttons in that tractor's AUX-N menu, and you're working.
Button Assignments Stay With the Tractor
Once you've assigned CH1–CH8 to armrest or joystick buttons, the tractor remembers the mapping. The relays do the load switching. Nothing on the dashboard to retrofit.
Technical Specifications
| Parameter | Specification |
|---|---|
| Relay channels | 8 |
| Current per channel | 10A max |
| Switching voltage | 30V DC / 250V AC |
| Supply voltage | 7-36V DC (12V and 24V systems) |
| Communication | ISOBUS (ISO 11783), 250 kbit/s |
| AUX-N functions | 8 (one per channel) |
| Isolation | Optocoupler isolated inputs and outputs |
| Mounting | DIN rail |
For loads exceeding 10A, use the relay to switch a larger external relay or contactor rated for your load.
Compatibility
Works with any tractor that has:
- ISOBUS Virtual Terminal (most tractors 2010 and newer)
- AUX-N support (for armrest/joystick control)
This includes John Deere, Fendt, Case IH, New Holland, Massey Ferguson, Claas, Valtra, Deutz-Fahr, Kubota, and others with ISOBUS capability. Sizing and installation questions — which kit fits your setup, whether you need a separate power supply, how termination works — are covered on the FAQ page.
Frequently Asked Questions
Can I control any 12V device from my tractor's ISOBUS display?
Yes. If it runs on 12V (or 24V) and needs to be switched on or off, you can control it through an ISOBUS relay module. The relay handles the electrical load while ISOBUS provides the control signal. Common applications include work lights, solenoid valves, beacons, electric motors, and any switched electrical device under 10A per channel.
What is the difference between ISOBUS relay control and traditional switches?
Traditional switches require drilling holes in the cab, running wires, and installing relay boxes. ISOBUS relay control uses your tractor's existing joystick and armrest buttons through the AUX-N system. The relay module mounts on the implement side, keeping your cab clean. Configuration happens on the tractor's display.
Do I need to modify my tractor's wiring?
No. The ISOBUS Block connects to your tractor's existing ISOBUS socket using standard connectors. No splicing, no drilling, no modifications to the tractor's electrical system.
How do I assign a relay to my tractor's joystick button?
Use your tractor's AUX-N assignment menu. Find the ISOBUS Block in the implement list, select a function (Input 1-8), then press the joystick or armrest button you want to assign. The tractor stores this assignment.
What is AUX-N and why does it matter?
AUX-N (Auxiliary Input Type N) is an ISOBUS standard that lets implements use the tractor's built-in controls. Instead of adding aftermarket switches, you assign functions to buttons that already exist in your cab. The tractor stores these assignments, so your setup persists even when the implement is disconnected.
Can I control multiple devices from one button?
Yes. You can configure one input to activate multiple relay channels simultaneously. For example, one button could activate a diverter valve solenoid and a work light at the same time. This is configured through the Virtual Terminal display.
What's the difference between momentary and toggle mode?
Momentary mode activates the relay only while you hold the button—release it and the relay turns off. Toggle mode switches the relay state with each press—press once to turn on, press again to turn off. Choose based on your application: momentary for hydraulic valves, toggle for lights.
Will my settings be saved when I turn off the tractor?
AUX-N button assignments are stored in the tractor and persist across power cycles. The relay configuration (which channels each input controls, momentary vs toggle) is stored in the module and also persists. Toggle states reset to OFF at power-on.
Can I use this with older implements that have no electronics?
Yes. This is one of the primary use cases. You're adding ISOBUS control to equipment that previously had none. Wire the implement's solenoids and lights to the relay terminals, connect the module to ISOBUS, and you have modern control over legacy equipment.
What if my work lights draw more than 10A?
Use the ISOBUS Block relay to switch a larger external relay or contactor rated for your load. The module's relay handles the control signal (low current); the external relay handles the high current to your lights.
Does this work with all ISOBUS tractors?
It works with any tractor that has an ISOBUS Virtual Terminal and AUX-N support. This includes most major brands from 2010 onwards: John Deere, Fendt, Case IH, New Holland, Massey Ferguson, Claas, Valtra, Deutz-Fahr, Kubota, and others.
How long does installation take?
The electrical connections are straightforward—wire your devices to the relay terminals and connect to ISOBUS. Configuration on the tractor takes a few minutes.
Can I control hydraulic solenoid valves?
Yes. Diverter valves, section control valves, lock valves, and other hydraulic solenoid valves are common applications. The relay switches power to the solenoid coil based on your button press.
Related Resources
- Front Loader Third Function - Diverter valve control for hydraulic multiplexing
- Modernizing Older Implements - Retrofit ISOBUS control to legacy equipment
- Multi-Solenoid Implement Control - Grouped outputs for complex implements
- Work Lights Installation Guide - Detailed work light setup
- Wiring Guide - Connection diagrams and examples
- AUX-N Configuration - Detailed AUX-N setup instructions
Learn more about ISOBUS Block or contact us with questions about your specific setup.